본 절은 [TM1637]를 사용하기 위해 알아야 할 내용과 실습 방법에 대해 설명한다. 아두이노 TM1637 특징, 동작원리, 사양, 연결 핀 배열, 출력 값, 주의사항을 알아본다. 아두이노와 TM1637을 연결하고, 간단한 코딩으로 TM1637을 쉽게 실습할 수 있다.
목차
[디스플레이] 아두이노 TM1637-7세그먼트

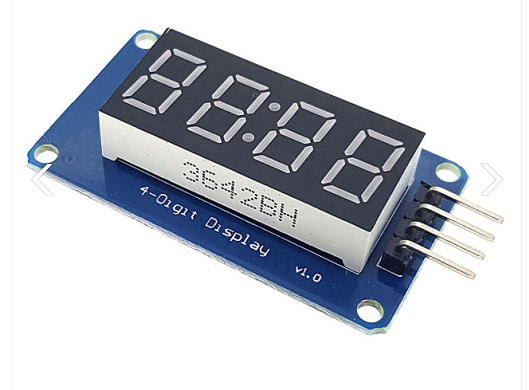
TM1637-7세그먼트란?
TM1637 칩을 기반으로 하는 7세그먼트 디스플레이 모듈이다.
SS1 아두이노 센서 특징
TM1637-7세그먼트의 특징은 다음과 같다.
- 입력 전원 : 3.3~5.5V
- 사용 전류 : 30~80mA
- M2 고정홀 4개
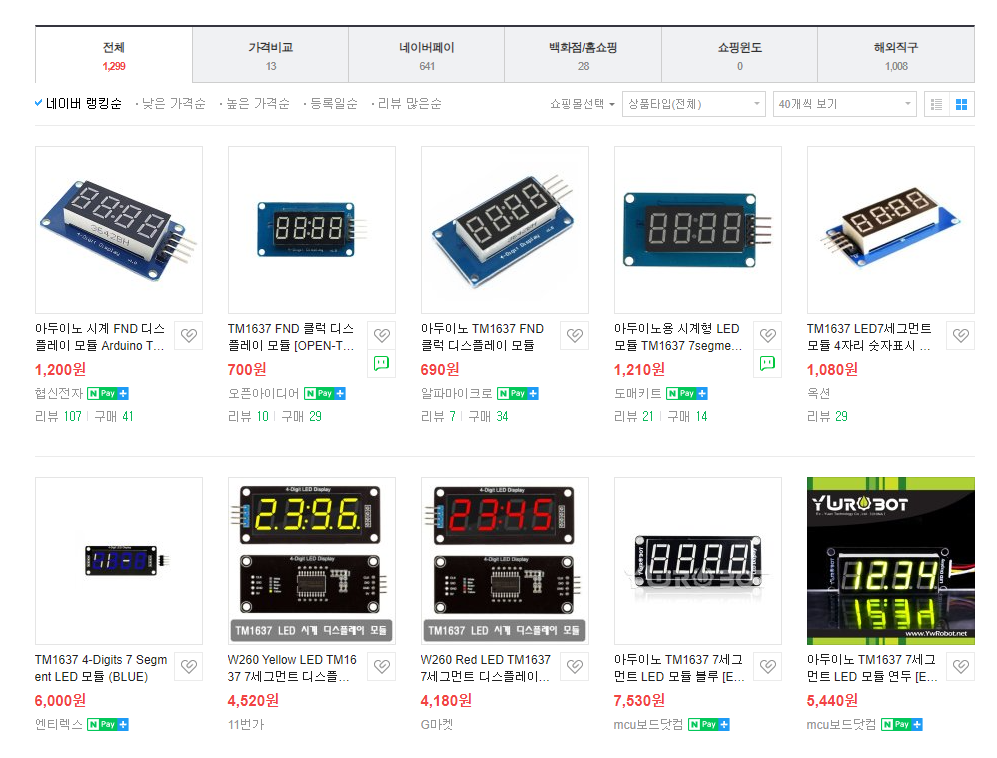
TM1637-7세그먼트 구입하기
[TM1637-7세그먼트]는 알리익스프레스, 네이버 쇼핑몰, 아마존 등에서 센서를 구입할 수 있다
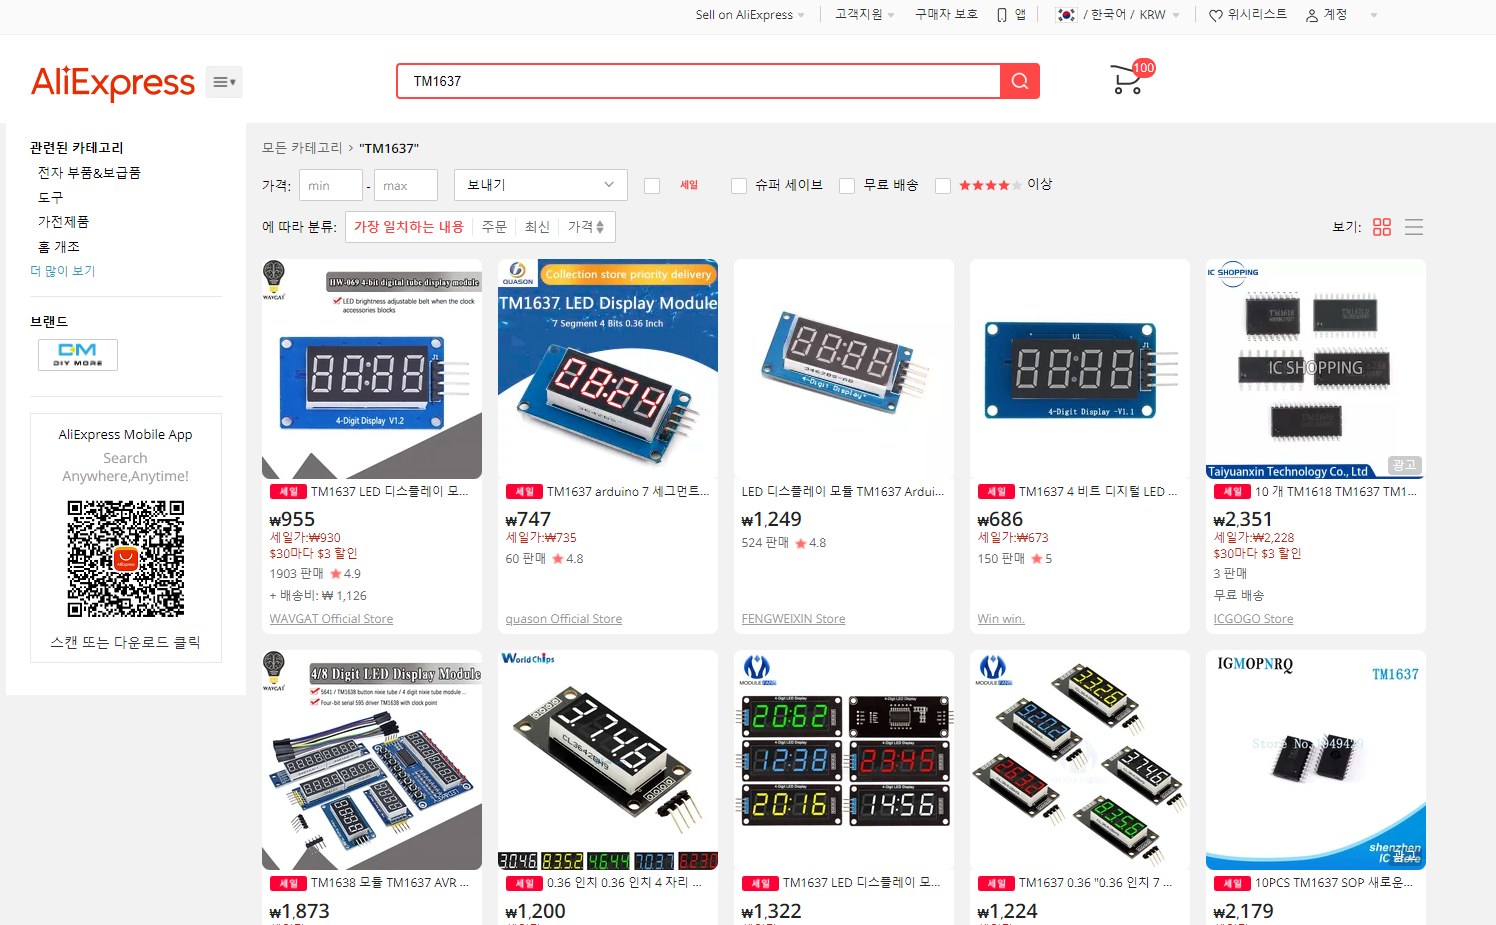
알리익스프레스에서다음과 같이 구입할 수 있다.
TM1637-7세그먼트 하드웨어 연결
다음과 같이 TM1637을 연결할 수 있다. 디스플레이 모듈에는 CLK 및 DIO인 2개의 신호 연결(및 2개의 전원 연결)이 있다. 이 핀은 Arduino의 모든 디지털 핀 쌍에 연결할 수 있다.
디스플레이에는 4개의 커넥터가 있다.
CLK - 클럭
DIO - 데이터
VCC - 전원 5v
GND - 접지
전원 참고: 안정적인 청정 전원은 회로 안정성에 중요하다. 고주파 업데이트 또는 애니메이션 시퀀스 중에 디스플레이 아티팩트가 표시되는 경우 TM1637과의 신호 타이밍 및 통신에 영향을 미치는 전력 변동이 발생할 수 있다. 이는 전력 조절이 없는 독립형 마이크로프로세서 애플리케이션에서 특히 그렇다. VCC 및 GND에 삽입된 극성화된 100uF 전해 커패시터는 스파이크를 부드럽게 만드는 데 도움이 될 수 있다.
소수 및 콜론: 일부 TM1637 디스플레이에는 디지털 시계에 사용되는 중간 콜론 LED가 장착되어 있지만 소수점은 없다. 일부 디스플레이에는 각 자릿수에 대한 소수점 LED가 있다. 일부는 둘 다 제공되지만 종종 소수점 LED가 연결되어 있지 않다. 이러한 추가 LED는 점 옆에 있는 숫자의 상위 비트(0x80)를 설정하여 활성화된다.
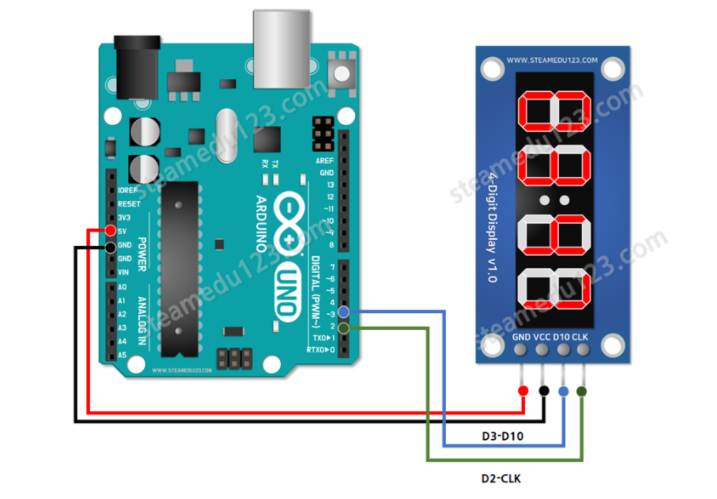

TM1637의 CLK는 아두이노의 D3 에 연결한다.
TM1637의 DIO는 아두이노의 D2 에 연결한다.
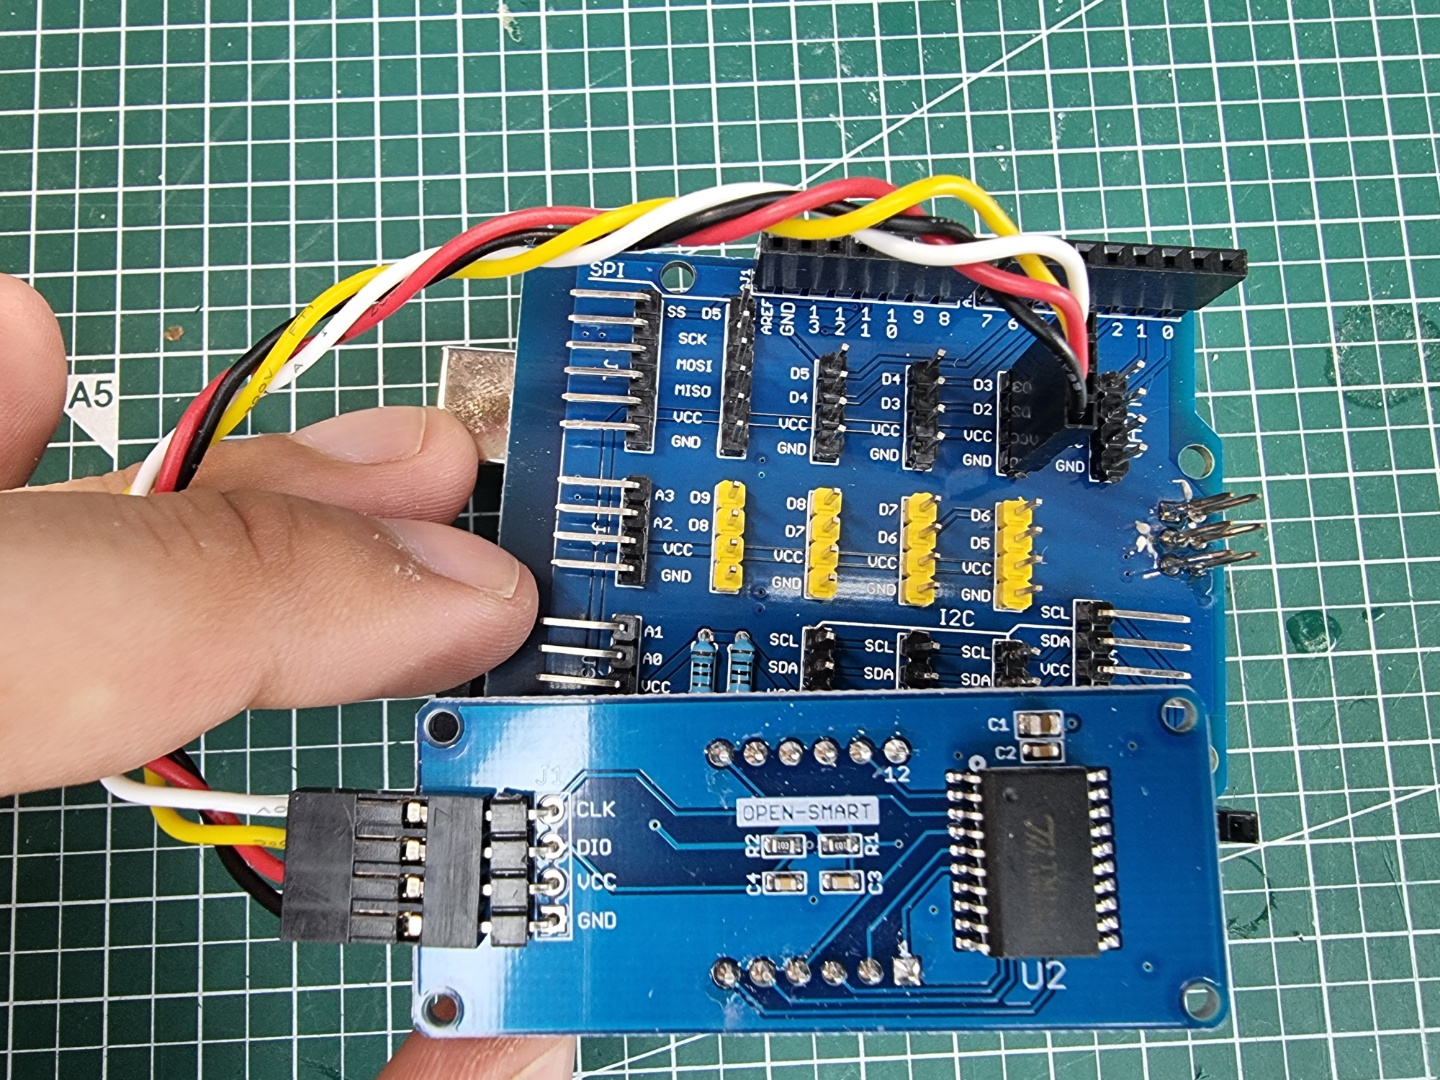
참고로 사용한 아두이노 쉴드는 다음과 같다.

TM1637-7세그먼트 TM1637TinyDisplay 라이브러리
TM1637 을 사용하기 위해서는 라이브러리를 다운로드 해야 한다. TM1637 칩을 기반으로 하는 7세그먼트 디스플레이 모듈용 Arduino 라이브러리이다 .

TM1637-7세그먼트 소프트웨어 코딩
하드웨어 연결이 완료되면, 아두이노 IDE를 이용해 아두이노 센서 소스코드를 코딩할 수 있다.

코드는 다음과 같다.
//  TM1637TinyDisplay TEST Sketch
//  This is a test sketch for the Arduino TM1637TinyDisplay LED Display library
//
//  Author: Jason A. Cox - @jasonacox - https://github.com/jasonacox
//  Date: 2 July 2020
//
//  Based on TM1637Display library at https://github.com/avishorp/TM1637
//

// Includes
#include <Arduino.h>
#include <TM1637TinyDisplay.h>

// Module connection pins (Digital Pins)
#define CLK 3
#define DIO 2

// The amount of time (in milliseconds) between tests
#define TEST_DELAY   1000

// Example of manually defining a display pattern
const uint8_t SEG_DONE[] = {
  SEG_B | SEG_C | SEG_D | SEG_E | SEG_G,           // d
  SEG_A | SEG_B | SEG_C | SEG_D | SEG_E | SEG_F,   // O
  SEG_C | SEG_E | SEG_G,                           // n
  SEG_A | SEG_D | SEG_E | SEG_F | SEG_G            // E
};

// Example animation sequence for showAnimation() Test
//  Built with 7-Segment Animator Tool
//  https://jasonacox.github.io/TM1637TinyDisplay/examples/7-segment-animator.html

const uint8_t ANIMATION[12][4] = {
  { 0x08, 0x00, 0x00, 0x00 },  // Frame 0
  { 0x00, 0x08, 0x00, 0x00 },  // Frame 1
  { 0x00, 0x00, 0x08, 0x00 },  // Frame 2
  { 0x00, 0x00, 0x00, 0x08 },  // Frame 3
  { 0x00, 0x00, 0x00, 0x04 },  // Frame 4
  { 0x00, 0x00, 0x00, 0x02 },  // Frame 5
  { 0x00, 0x00, 0x00, 0x01 },  // Frame 6
  { 0x00, 0x00, 0x01, 0x00 },  // Frame 7
  { 0x00, 0x01, 0x00, 0x00 },  // Frame 8
  { 0x01, 0x00, 0x00, 0x00 },  // Frame 9
  { 0x20, 0x00, 0x00, 0x00 },  // Frame 10
  { 0x10, 0x00, 0x00, 0x00 }   // Frame 11
};

// To save RAM space, we can store the animation sequences in PROGMEM read-only flash memory.
// This requires using the showAnimation_P() function to read from PROGMEM memory space.

const uint8_t ANIMATION2[40][4] PROGMEM = {
  { 0x00, 0x00, 0x00, 0x00 },  // Frame 0
  { 0x01, 0x00, 0x00, 0x00 },  // Frame 1
  { 0x40, 0x01, 0x00, 0x00 },  // Frame 2
  { 0x08, 0x40, 0x00, 0x01 },  // Frame 3
  { 0x00, 0x08, 0x01, 0x40 },  // Frame 4
  { 0x01, 0x00, 0x40, 0x08 },  // Frame 5
  { 0x40, 0x01, 0x08, 0x00 },  // Frame 6
  { 0x08, 0x40, 0x00, 0x01 },  // Frame 7
  { 0x00, 0x08, 0x01, 0x40 },  // Frame 8
  { 0x01, 0x01, 0x40, 0x08 },  // Frame 9
  { 0x40, 0x40, 0x09, 0x00 },  // Frame 10
  { 0x08, 0x08, 0x40, 0x01 },  // Frame 11
  { 0x01, 0x00, 0x08, 0x40 },  // Frame 12
  { 0x40, 0x01, 0x00, 0x08 },  // Frame 13
  { 0x08, 0x40, 0x01, 0x00 },  // Frame 14
  { 0x01, 0x09, 0x41, 0x01 },  // Frame 15
  { 0x40, 0x40, 0x48, 0x40 },  // Frame 16
  { 0x08, 0x08, 0x08, 0x08 },  // Frame 17
  { 0x1c, 0x1c, 0x1c, 0x1c },  // Frame 18
  { 0x3e, 0x3e, 0x3e, 0x3e },  // Frame 19
  { 0x3f, 0x3f, 0x3f, 0x3f },  // Frame 20
  { 0x3f, 0x3f, 0x3f, 0x3f },  // Frame 21
  { 0x3f, 0x3f, 0x3f, 0x3f },  // Frame 22
  { 0x00, 0x00, 0x00, 0x00 },  // Frame 23
  { 0x00, 0x00, 0x00, 0x00 },  // Frame 24
  { 0x3f, 0x3f, 0x3f, 0x3f },  // Frame 25
  { 0x3f, 0x3f, 0x3f, 0x3f },  // Frame 26
  { 0x3f, 0x3f, 0x3f, 0x3f },  // Frame 27
  { 0x00, 0x00, 0x00, 0x00 },  // Frame 28
  { 0x00, 0x00, 0x00, 0x00 },  // Frame 29
  { 0x00, 0x00, 0x00, 0x00 },  // Frame 30
  { 0x3f, 0x3f, 0x3f, 0x3f },  // Frame 31
  { 0x3f, 0x3f, 0x3f, 0x3f },  // Frame 32
  { 0x3f, 0x3f, 0x3f, 0x3f },  // Frame 33
  { 0x00, 0x00, 0x00, 0x00 },  // Frame 34
  { 0x00, 0x00, 0x00, 0x00 },  // Frame 35
  { 0x00, 0x00, 0x00, 0x00 },  // Frame 36
  { 0x3f, 0x3f, 0x3f, 0x3f },  // Frame 37
  { 0x3f, 0x3f, 0x3f, 0x3f },  // Frame 38
  { 0x3f, 0x3f, 0x3f, 0x3f }   // Frame 39
};

// Text string constants can be stored in PROGMEM read-only flash memory.
// This requires using the showString_P() function to read from PROGMEM memory space.
// PROGMEM space strings are globally defined.

const PROGMEM char FlashString[] = "Flash Test - 1234567890";
const PROGMEM char FlashString2[] = "good";

// Initialize TM1637TinyDisplay - 4 Digit Display
TM1637TinyDisplay display(CLK, DIO);
// Initialize TM1637TinyDisplay - 6 Digit Display
// TM1637TinyDisplay6 display(CLK, DIO);

void setup()
{
}

void loop()
{
  int k;
  uint8_t data[] = { 0xff, 0xff, 0xff, 0xff, 0xff, 0xff };    // Test Pattern - All
  uint8_t blank[] = { 0x00, 0x00, 0x00, 0x00, 0x00, 0x00 };   // Test Pattern - Blank
  display.setBrightness(BRIGHT_HIGH);

  // Announce Testing
  display.showString("Test");
  delay(TEST_DELAY);

  // All segments on
  display.setSegments(data);
  delay(TEST_DELAY);

  // Test setting different digits
  data[0] = display.encodeDigit(0);
  data[1] = display.encodeDigit(1);
  data[2] = display.encodeDigit(2);
  data[3] = display.encodeDigit(3);
  display.setSegments(data);
  delay(TEST_DELAY);

  // Test display splitting with position
  display.clear();
  display.setSegments(data + 2, 2, 2);    // Length 2, Position 2
  delay(TEST_DELAY);
  display.clear();
  display.setSegments(data + 2, 2, 1);    // Length 2, Position 1
  delay(TEST_DELAY);
  display.clear();
  display.setSegments(data + 1, 3, 1);    // Length 3, Position 1
  delay(TEST_DELAY);

  // Test decimal numbers with/without leading zeros in different positions
  display.showNumber(0, false);         // Expect: ___0
  delay(TEST_DELAY);
  display.showNumber(0, true);          // Expect: 0000
  delay(TEST_DELAY);
  display.showNumber(1, false);         // Expect: ___1
  delay(TEST_DELAY);
  display.showNumber(1, true);          // Expect: 0001
  delay(TEST_DELAY);
  display.showNumber(301, false);       // Expect: _301
  delay(TEST_DELAY);
  display.showNumber(301, true);        // Expect: 0301
  delay(TEST_DELAY);
  display.clear();
  display.showNumber(14, false, 2, 1);  // Expect: _14_
  delay(TEST_DELAY);
  display.clear();
  display.showNumber(4, true, 2, 2);    // Expect: __04
  delay(TEST_DELAY);
  display.showNumber(-1, false);        // Expect: __-1
  delay(TEST_DELAY);
  display.showNumber(-12);              // Expect: _-12
  delay(TEST_DELAY);
  display.showNumber(-999);             // Expect: -999
  delay(TEST_DELAY);
  display.clear();
  display.showNumber(-5, false, 3, 0);  // Expect: _-5_
  delay(TEST_DELAY);
  display.showNumberHex(0xf1af);        // Expect: f1Af
  delay(TEST_DELAY);
  display.showNumberHex(0x2c);          // Expect: __2C
  delay(TEST_DELAY);
  display.showNumberHex(0xd1, 0, true); // Expect: 00d1
  delay(TEST_DELAY);
  display.clear();
  display.showNumberHex(0xd1, 0, true, 2); // Expect: d1__
  delay(TEST_DELAY);

  // Floating point tests
  display.showNumber(1.234);  // Floating point number
  delay(TEST_DELAY);

  display.showNumber(1.234, 2); // Format to 2 decimal places
  delay(TEST_DELAY);

  display.showNumber(-1.234); // Negative floating point number
  delay(TEST_DELAY);

  display.showNumber(-0.5); // Zero prefix floating point number
  delay(TEST_DELAY);

  display.showNumber(0.4);
  delay(TEST_DELAY);

  display.showNumber(1005.3);
  delay(TEST_DELAY);

  display.showNumber(10005.3);  // Overflow test
  delay(TEST_DELAY);

  display.showNumber(0.52345, 1);
  delay(TEST_DELAY);

  display.showNumber(0.255, 2); // Test rounding up
  delay(TEST_DELAY);

  display.clear();
  display.showString("\xB0", 1, 3);   // Test with suffix
  display.showNumber(12.3, 4, 3, 0);
  delay(TEST_DELAY);

  for (int x = -100; x < 100; x = x + 1) {  // Count
    display.showNumber((float)x / 10.0);
  }

  // Test all the dots
  for (k = 0; k <= 4; k++) {
    display.showNumberDec(0, (0x80 >> k), true);
    delay(TEST_DELAY);
  }

  // Test Brightness Levels
  for (k = 0; k < 4; k++)
    data[k] = 0xff;
  for (k = 0; k < 7; k++) {
    display.setBrightness(k);
    display.setSegments(data);
    delay(TEST_DELAY);
  }

  // Test Display On/Off
  for (k = 0; k < 4; k++) {
    display.setBrightness(7, false);    // Turn off
    display.setSegments(data);
    delay(TEST_DELAY);
    display.setBrightness(7, true);     // Turn on
    display.setSegments(data);
    delay(TEST_DELAY);
  }

  // Test Horizontal Level Meter
  for (int count = 0; count < 3; count++) {
    for (int x = 0; x <= 100; x = x + 10) {
      display.showLevel(x, true);
      delay(20);
    }
    for (int x = 100; x > 0; x = x - 10) {
      display.showLevel(x, true);
      delay(20);
    }
  }
  // Test Vertical Level Meter
  for (int count = 0; count < 3; count++) {
    for (int x = 0; x <= 100; x = x + 10) {
      display.showLevel(x, false);
      delay(20);
    }
    for (int x = 100; x > 0; x = x - 10) {
      display.showLevel(x, false);
      delay(20);
    }
  }

  // Test Numbers and Strings  Using Positions
  display.clear();
  char degree[] = "\xB0";
  display.showString(degree, 1, 3);     // Position 3 (right) and 1 char length
  for (int x = -50; x < 150; x++) {
    display.showNumber(x, false, 3, 0); // Postion 0 (left) and 3 char length
    delay(10);
  }
  delay(TEST_DELAY);

  // Test String Display
  display.clear();
  display.showString("String Test 1234"); // Test literal string
  delay(TEST_DELAY);
  display.clear();
  char stringb[10];                 // Test dynamic string
  sprintf(stringb, "25%cC", '\xB0'); // Display 25 + degree symbol + C
  display.showString(stringb);
  delay(TEST_DELAY);
  display.clear();                  // Long string test
  display.showString("abcdefghijklmnopqrstuvwxyz.-=ABCDEFGHIJKLMNOPQRSTUVWXYZ");
  delay(TEST_DELAY);

  // Test Strings in PROGMEM flash memory
  display.showString_P(FlashString);
  delay(1000);
  display.showString_P(FlashString2);
  delay(1000);

  // Animation Sequence Test in SRAM - Run 3 times
  display.clear();
  for (int count = 0; count < 3; count++) {
    display.showAnimation(ANIMATION, FRAMES(ANIMATION), TIME_MS(10));
  }
  display.clear();
  delay(TEST_DELAY);

  // Animation Sequence Test in PROGMEM flash memory
  display.clear();
  display.showAnimation_P(ANIMATION2, FRAMES(ANIMATION2), TIME_MS(50));

  // Done!
  display.clear();
  display.showString("The");
  delay(TEST_DELAY);
  display.showString("End");
  delay(TEST_DELAY);
  display.setSegments(SEG_DONE);
  delay(TEST_DELAY * 5);

}

TM1637-7세그먼트 동작확인
하드웨어 연결, 소프트웨어 코딩이 완료되면 다음과 같이 동작 화면을 확인할 수 있다.
------------------------------------------------------
개발환경 : WINDOWS 10
아두이노 IDE : 1.8.13
------------------------------------------------------
01 연결
- 아두이노와 PC 연결
- 아두이노 IDE 실행
- 메뉴 → 툴 → 보드:아두이노 UNO 확인
- 메뉴 → 스케치 → 확인/컴파일
02 컴파일 확인
스케치>확인/컴파일(CTRL+R) 를 선택해서 컴파일을 진행한다.
03 아두이노 우노 업로드
컴파일이 이상없이 완료되면 스케치>업로드(CTRL+U) 를 선택해서 컴파일 파일을 업로드 한다.

04 동작 확인
다음과 같이 동작을 확인할 수 있다.

마무리
아두이노와 TM1637-7세그먼트를 연결하고, 간단한 코딩으로 모듈을 쉽게 실습할 수 있다.

모두의 아두이노 환경 센서 책
[모두의 아두이노 환경 센서] 책은 예스24, 인터넷 교보문고, 알라딘, 인터파크도서, 영풍문고, 반디앤루니스 , 도서11번가 등에서 구입할 수 있다. 이 책에서는 PMS7003, GP2Y1010AU0F, PPD42NS, SDS011 미세먼지 센서, DHT22 온습도 센서, MH-Z19B 이산화탄소 센서, ZE08-CH2O 포름알데히드 센서, CCS811 총휘발성유기화합물 TVOC, GDK101 방사선(감마선) 센서, MQ-131 오존(O3) 센서, MQ-7 일산화탄소, MICS-4514 이산화질소 센서, MICS-6814 암모니아 센서, DGS-SO2 아황산가스(SO2) 센서, BME280 기압 센서, GUVA-S12SD 자외선(UV) 센서, MD0550 기류 센서, QS-FS01 풍속 센서(Wind speed) 를 사용한다.
모두의 아두이노 환경 센서
아두이노와 센서로 내 건강을 지킬 수 있다!다양한 환경 센서를 실생활 프로젝트에 응용해보자!시중에 판매되고 있는 간이측정기도 센서로 값을 측정합니다. 똑같은 센서를 아두이노에 연결하
book.naver.com
'모두의 아두이노' 카테고리의 다른 글
| [아두이노] Keywish BLE-Nano for Arduino Nano V3.0 Mirco USB (0) | 2021.12.01 |
|---|---|
| [아두이노][쉴드] Data logger shield sd card and real time clock (0) | 2021.11.25 |
| [아두이노][쉴드] 아두이노 다기능 확장 쉴드 (0) | 2021.11.16 |
| [아두이노][센서] NEO-6M GPS 확장 쉴드 SD 카드 사용하기 (MicroSD) - ReadWrite 테스트 (0) | 2021.11.16 |
| [아두이노] 조이스틱 쉴드 (0) | 2021.11.11 |


댓글